If you’re looking to improve your flexibility and balance, Triangle pose may be just what you need. Also known as Trikonasana, this classic yoga pose provides an excellent stretch for your entire body, especially your legs, hips, and spine. In this section, I will guide you through the step-by-step instructions on how to do Triangle pose correctly.
Key Takeaways:
- Triangle pose is also called Trikonasana, and it’s an excellent stretch for your legs, hips, and spine.
- Before starting, warm up with a few gentle stretches, such as Cat-Cow or Child’s pose.
- Follow the step-by-step instructions to do Triangle pose correctly, making sure to keep your body aligned and your chest open.
- If you’re a beginner, use a block under your hand for support, or try a modified version of the pose.
- Hold the pose for 30-60 seconds, breathing deeply, and release when you’re ready.
Table of Contents
Triangle Pose Benefits and Difficulty
Practicing Triangle pose, also known as Trikonasana, can offer a multitude of benefits for both the mind and body. This asana is an excellent way to enhance flexibility, improve balance, and stimulate digestion.
One of the key benefits of Triangle pose is its ability to stretch and strengthen the muscles in the legs, hips, and back. As a result, this can help alleviate lower back pain and improve overall posture. Additionally, practicing this asana can enhance the function of the digestive organs and aid in detoxification.
While Triangle pose offers numerous benefits, it can also be challenging, especially for beginners. The extended reach required can put strain on the hamstrings and lower back, making it difficult to maintain proper alignment. However, with time and practice, most individuals can overcome these challenges and reap the rewards of this powerful asana.
It’s important to remember that everyone’s body is unique, and what may be easy for one person could be challenging for another. Therefore, it’s essential to listen to your body and practice mindfully, respecting your limitations and challenging yourself accordingly.
As you continue to practice Triangle pose, it’s essential to focus on proper alignment and engage the core muscles to maintain stability. Taking the time to learn the correct alignment and modifications can help alleviate any discomfort and improve your overall experience with this asana.
Triangle pose Warm up
Before you begin, it’s important to warm up your body with a few gentle stretches, such as Cat-Cow or Child’s pose. Once you’re ready, follow these steps to do Triangle pose:
- Start in Mountain pose (Tadasana), with your feet hip-width apart and your arms at your sides. Inhale deeply.
- Exhale as you step your left foot back about 3-4 feet. Pivot your left foot out at a 45-degree angle and ground your heel firmly into the mat.
- Inhale as you reach your arms out to the sides, parallel to the floor, with your palms facing down.
- Exhale as you hinge at your hips to the right, extending your torso over your right leg. Keep your left hip pulled back, and your right hip pushing forward. Rest your right hand on your shin, ankle, or the floor, depending on your flexibility.
- Extend your left arm straight up towards the ceiling, with your palm facing forward. Gaze up at your fingertips.
- Hold the pose for 30-60 seconds, breathing deeply. To release, inhale as you lift your torso, and bring your arms back to your sides. Repeat on the other side.
Remember to keep your body aligned throughout the pose, with your shoulders stacked over your hips, and your chest open. If you’re a beginner, you may want to use a block under your hand for support, or try a modified version of the pose.
Preparatory Poses for Triangle Pose
If you’re new to practicing Triangle pose, or if you’re looking to refine your form, incorporating preparatory poses into your routine can help you ease into the asana and avoid common mistakes.
1. Warrior II (Virabhadrasana II)
Warrior II pose is a great pose to practice before attempting Triangle pose. Similar to Triangle, Warrior II helps improve balance and build strength in the legs.
To perform this pose, start in Tadasana (Mountain pose) and step your left foot back, turning it outwards to a 90-degree angle. Bend your front knee over your ankle and extend both arms out to the sides, keeping them parallel to the floor. Hold for several breaths, then switch sides.
2. Extended Side Angle (Utthita Parsvakonasana)
Extended side angle pose can help you stretch and strengthen the hips, legs, and spine, which are all essential for a successful Triangle pose.
To perform this pose, start in Warrior II with your front knee bent. Then, lower your right arm down and place it on the ground (or a block) outside of your right foot. Extend your left arm upwards, keeping your gaze towards the ceiling. Hold for several breaths before switching sides.
3. Half Moon (Ardha Chandrasana)
Half moon pose can help you practice shifting your weight and balancing on one foot, which is crucial for Triangle pose. To perform this pose, start in Warrior II with your right leg forward.
Place your left hand on your left hip, then start shifting your weight forward onto your right foot as you lift your left leg off the ground. Extend your left arm towards the ceiling and gaze upwards. Hold for several breaths before switching sides.
By incorporating these preparatory poses into your practice, you can ensure that your body is ready for Triangle pose and improve your overall yoga practice.
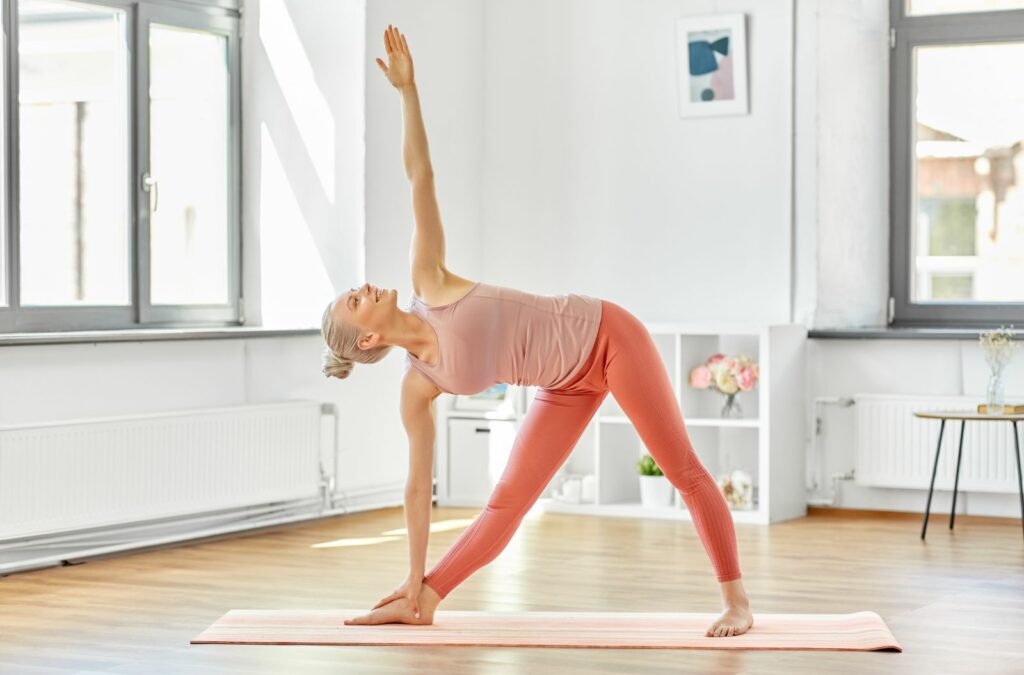
How to Practice Triangle Pose
Triangle pose, or Trikonasana, is a challenging asana that requires focus and balance. By following these step-by-step instructions and beginner tips, you can practice Triangle pose safely and effectively:
- Begin in Tadasana: Stand at the top of your mat with your feet hip-distance apart. Ground down through all four corners of your feet and engage your core.
- Step your left foot back: Turn your left foot out 90 degrees and your right foot in slightly. Align your left heel with your right heel.
- Extend your arms: Inhale and extend your arms out to the sides, parallel to the floor. Your palms should face down.
- Reach forward: Exhale and reach your right arm forward, hinging at your right hip. Place your right hand on the floor, a block, or your shin.
- Stretch up: Inhale and stretch your left arm up towards the ceiling. Turn your gaze to your left thumb.
- Maintain alignment: Keep your legs straight and engaged, and your hips level. Lengthen your spine and avoid collapsing your chest.
- Breathe smoothly: Take long, deep breaths in and out through your nose. Relax your shoulders and facial muscles.
- Repeat on the other side: To come out of the pose, inhale and lift your left arm up. Exhale and release your arms and legs. Repeat on the other side.
As a beginner, it’s important to focus on proper alignment and to listen to your body. Don’t push yourself too hard, and modify the pose as needed. Here are some additional tips:
- Use a block: If you can’t reach the floor with your hand, place a block under your bottom hand for support.
- Bend your knee: If you have tight hamstrings, bend your front knee slightly to ease into the pose.
- Take breaks: If you feel lightheaded or dizzy, rest in Child’s Pose or come out of the pose altogether.
- Practice regularly: With consistent practice, you can gradually improve your flexibility and balance in Triangle pose.
Modifications and Props for Triangle Pose
If you are new to Triangle pose or have physical limitations, modifications and props can help make this asana more accessible and comfortable for your body. Here are some options to consider:
Chair Triangle Pose
If you have trouble reaching the floor or maintaining balance, using a chair can be helpful. Start with a chair next to your mat and place your front foot on the chair while reaching your opposite hand towards the ceiling. This modification allows you to focus on proper alignment without compromising your balance.
Props for Tight Hips
If you have tight hips, placing a block under your bottom hand can help you maintain proper alignment while keeping your hand from touching the ground. You can also use a strap around your top shoulder and bottom foot to help create more space and openness in the hips.
Wall Triangle Pose
For those who struggle with balance, using a wall can be helpful. Start with your back against the wall and your feet about a foot away from the wall. As you move into Triangle pose, use the wall to help support your balance and prevent you from falling over.
Partner Assistance
If you are practicing with a partner, they can assist you in Triangle pose by gently pressing on your hip or back to help deepen the stretch and promote proper alignment. This can be especially helpful for those who are working on improving their range of motion.
Remember, modifying Triangle pose does not mean you are doing it wrong. It simply means you are adapting the asana to fit your individual needs and abilities. Use these modifications and props to enhance your practice and make Triangle pose a more comfortable and beneficial experience.
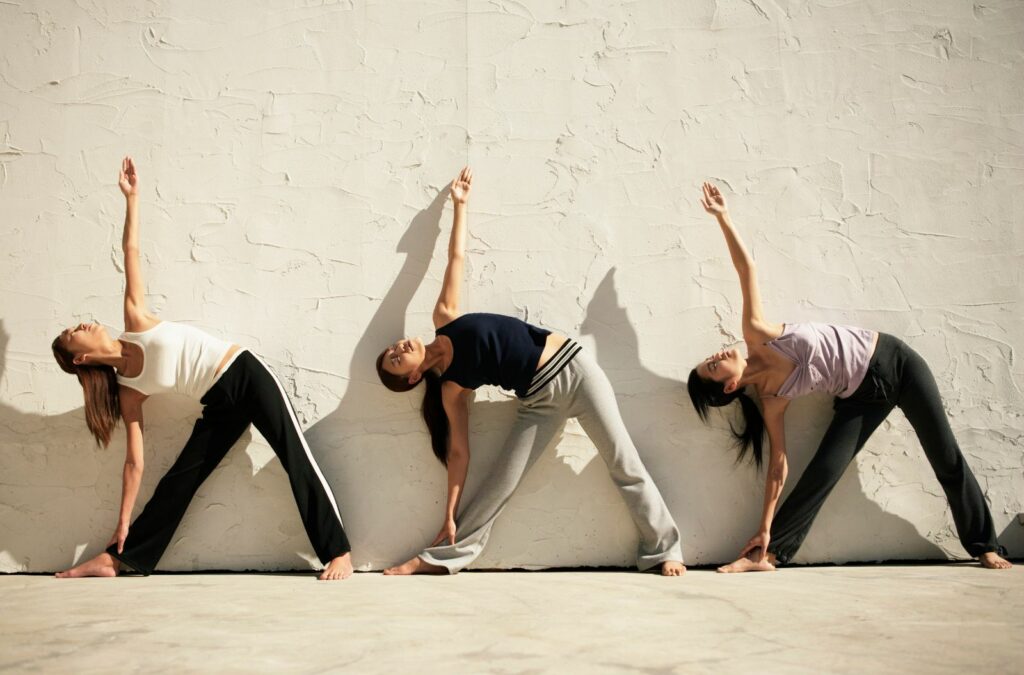
Variations and Pose Partnering with Triangle Pose
Triangle pose is a versatile asana that can be modified and adapted to suit individual needs and abilities. By incorporating variations and pose partnering, you can deepen your practice and explore new ways of experiencing this pose.
Triangle Pose Variations
There are several variations of Triangle pose that can challenge your body and enhance your understanding of the asana.
- Revolved Triangle Pose: This variation involves twisting the torso while in Triangle pose, providing a deeper stretch for the spine and hamstrings.
- Bounded Triangle Pose: In this variation, a strap is used to bind the hands behind the back, adding an extra element of challenge to the pose.
- Half Triangle Pose: If you are experiencing difficulty with the full expression of Triangle pose, try Half Triangle Pose. This variation involves placing the hand on a block or the shin instead of reaching for the ground.
Experiment with these variations and find the one that works best for you. Remember to maintain proper alignment and breath control throughout the practice.
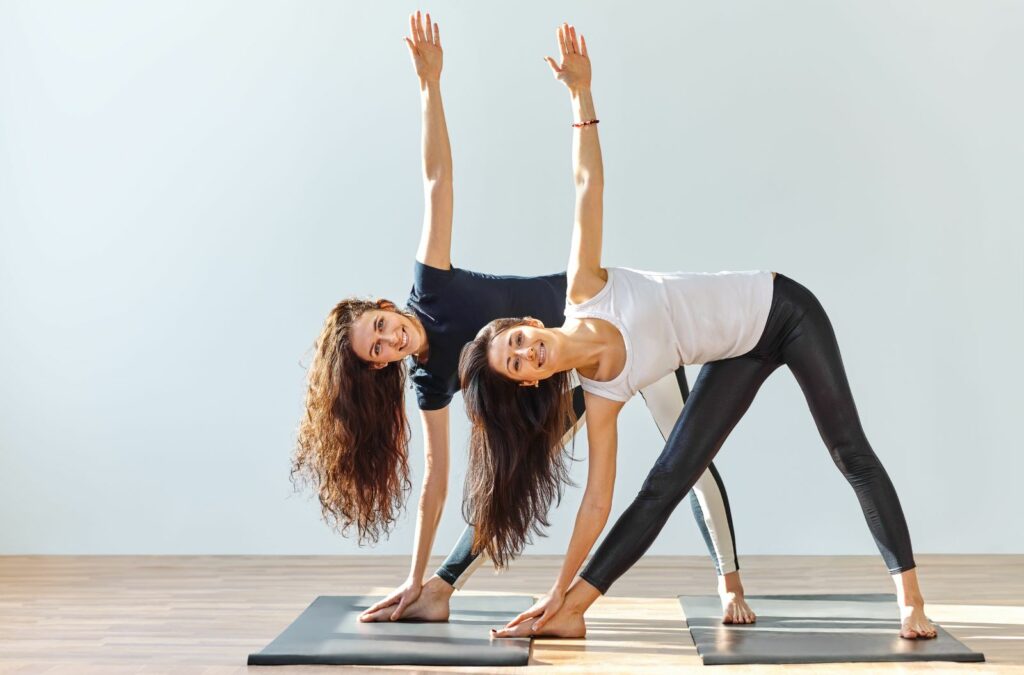
Pose Partnering
Pose partnering can be a fun and beneficial way to deepen your practice and learn from others.
One way to incorporate pose partnering into Triangle pose is to work with a partner to create a mirror image of the pose. Stand facing each other with arms extended, and then reach for each other’s hands, creating a triangle shape with your bodies.
Another way to practice pose partnering is to work in pairs, taking turns as the “base” and “flyer“. In this variation, the base supports the flyer’s leg while they extend into Triangle pose, creating a sense of trust and connection between partners.
Adding variations and pose partnering to your Triangle pose practice can enhance your experience and deepen your understanding of the asana. Always remember to listen to your body and practice mindfully to avoid injury.
Conclusion
In conclusion, practicing Triangle pose can bring about a range of physical, mental, and emotional benefits for individuals of all levels of experience. By following the step-by-step instructions, exploring modifications and variations, and incorporating preparatory poses, you can gradually perfect your Triangle pose and reap its numerous benefits.
It’s important to approach your practice mindfully and with patience, staying aware of your body’s limitations and gently pushing yourself to new levels of flexibility and balance. Remember, there’s no right or wrong way to practice Triangle pose – it’s all about finding what works best for you and your unique body.
With consistent practice and a willingness to challenge yourself, you can achieve a deeper sense of connection between your mind, body, and spirit, and tap into the full potential of the Triangle pose. So go ahead, give it a try, and enjoy the journey towards a balanced, healthy, and harmonious body. Namaste!
Amanda Frier, a certified Power Yoga teacher living in the dynamic city of Sydney, Australia, has embarked on an inspiring journey of dedication and empowerment through the practice of yoga.
Her story, characterized by her commitment to sharing the transformative power of Power Yoga, showcases the profound impact one can have even without the spotlight of social media influence.